iShappsâ€ēFirst Login & Setup
v1.0
Chapter 1 ¡ Getting Started
First Login & Setup
Welcome to iShapps. This section walks you through your first login and initial account setup after registration.

1Accessing the Portal

The iShapps Facility Portal is accessible via the Smart Healthcare Solutions website. Click the Admin Login button at the top right corner of the page.

Website:ishapps.com
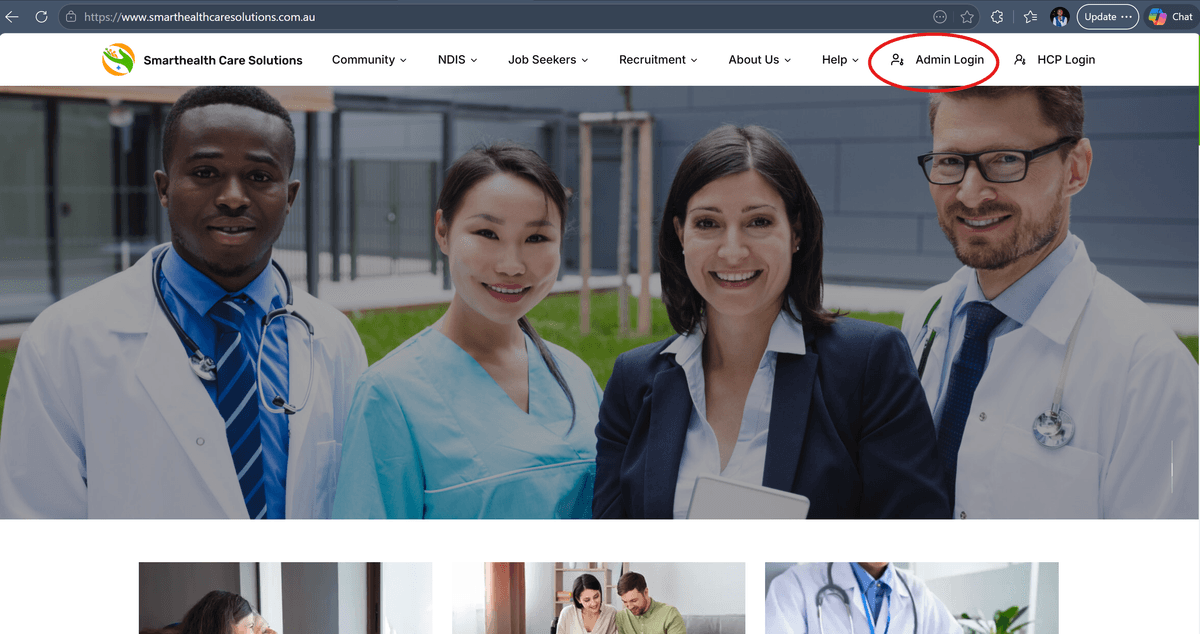
Smart Healthcare Solutions Website

2Logging In

Once you click the Admin Login button, the login window will appear. Use the email address and password that were sent to you during registration.

  1. 1
    Enter your email address
    Use the email address provided in your registration confirmation email.
  2. 2
    Enter your password
    Use the temporary password from your welcome email. You will be prompted to change it on first login.
  3. 3
    Click the Login button
    You will be redirected to your facility dashboard on successful authentication.
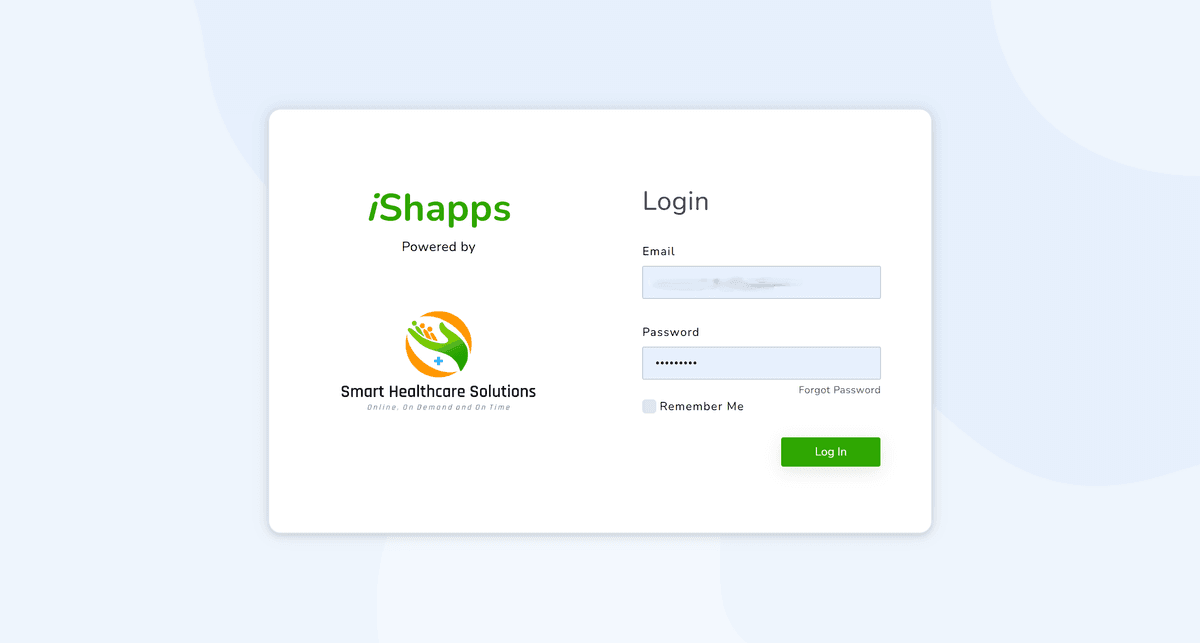
Login Screen
💡
The welcome registration email also contains a direct link to the login page — you can bookmark it for daily access.
Chapter 2 ¡ Navigation
Dashboard Overview
After login you land on your main dashboard. From here you can navigate every section of the platform.

1Dashboard Layout

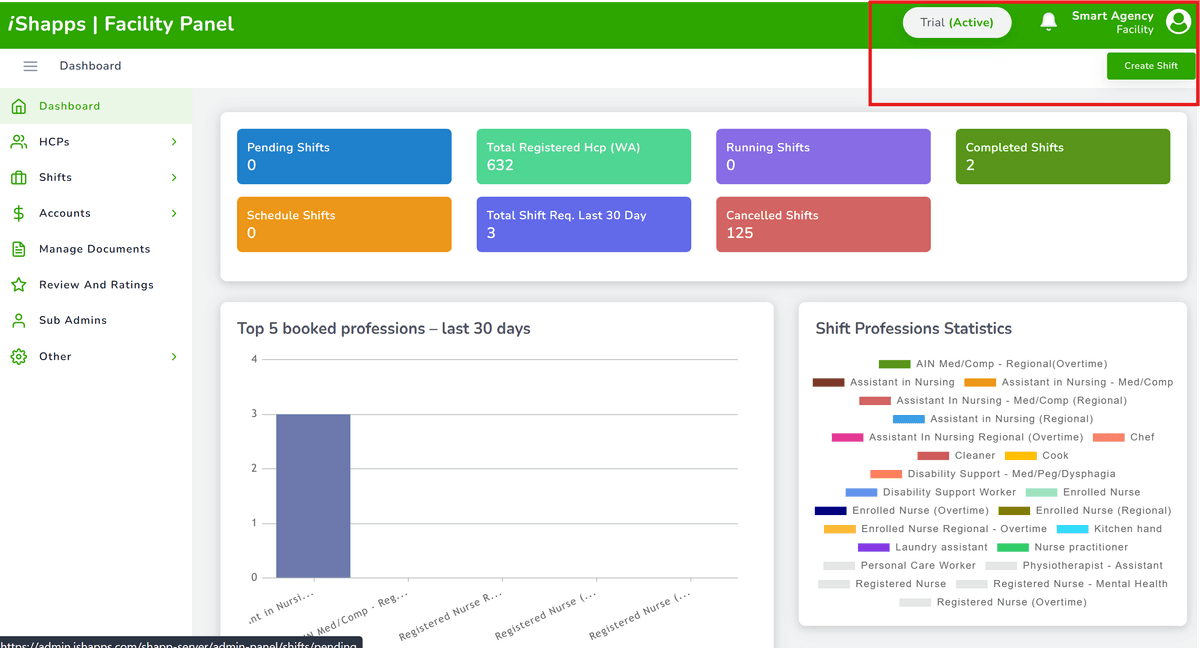
The dashboard provides a summary of your facility's activity — current shifts, pending approvals, and quick access to key functions.
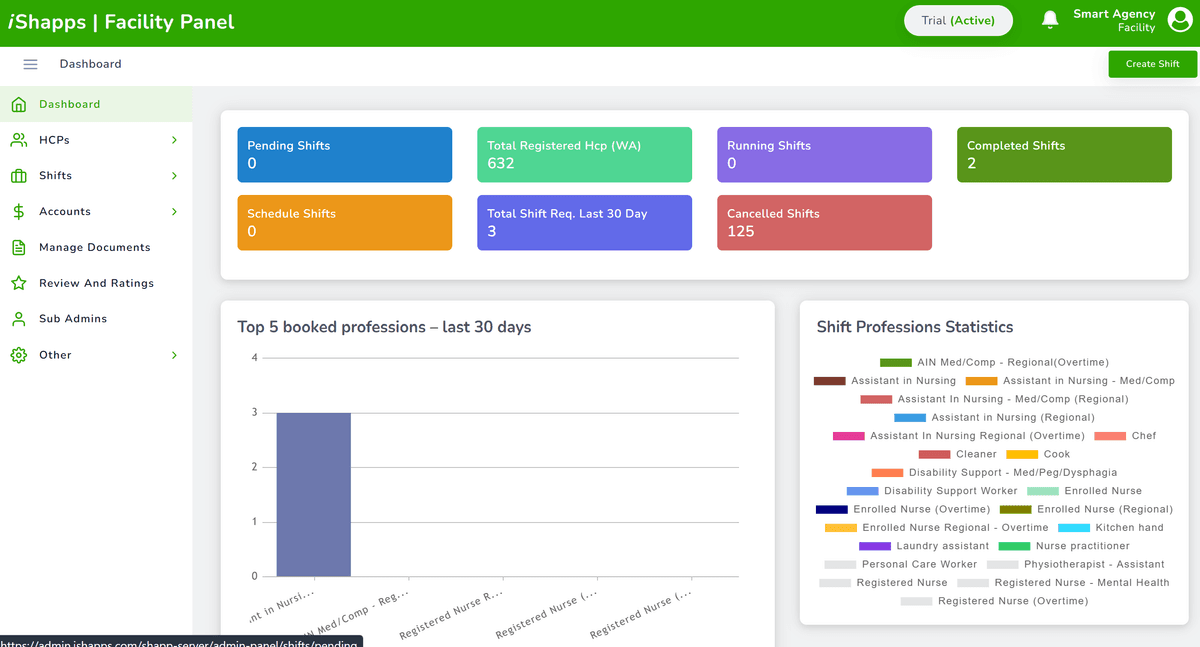
Main Dashboard

2Left Menu Navigation

Use the left-hand menu to navigate between sections of the platform. Here is what each item does:

🏠
Dashboard
Returns you to the main overview screen.
📅
Shifts
View and manage all shift types and statuses.
đŸ‘Ĩ
HCPs
Browse and manage healthcare professionals.
🧾
Accounts
Access invoices and subscription billing.
📁
Documents
Upload or download duty statements and files.
⭐
Reviews
Rate HCPs and view your facility's ratings.

3Facility Profile

Your facility profile — including profile details and password changes — is accessible from the top-right of the dashboard.
Facility Profile
â„šī¸
Your plan type is displayed on the dashboard. Contact Smart Healthcare Solutions to upgrade or change your plan.
Chapter 3 ¡ Core Features
Creating Shifts
Post single or multiple shifts, set requirements, and assign or broadcast to available healthcare professionals.
â„šī¸
8-hour shifts: End time auto-populates from start time.
4-hour shifts: You must enter the end time manually.

1Two Ways to Create a Shift

1ī¸âƒŖ
Single Shift
Post one shift for a specific role, ward, and time slot.
2ī¸âƒŖ
Multiple Shifts
Post openings across several wards at once using the multiple shift window.

Creating a Single Shift

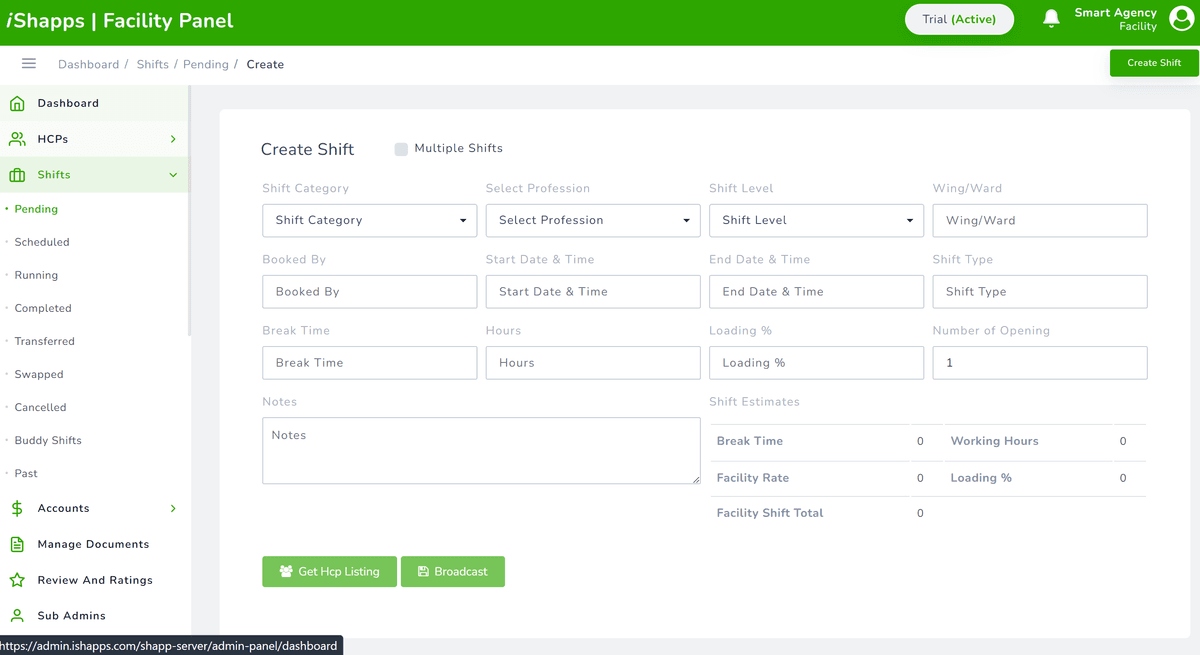
  1. 1
    Click "Create Shift"
    The button is in the top-right corner of the dashboard or current window.
  2. 2
    Select category, profession level, and ward
    Choose the appropriate healthcare category and the ward this shift is for.
  3. 3
    Enter the booking contact and shift start time
    For 8-hour shifts the end time auto-populates. For 4-hour shifts, enter the end time manually.
  4. 4
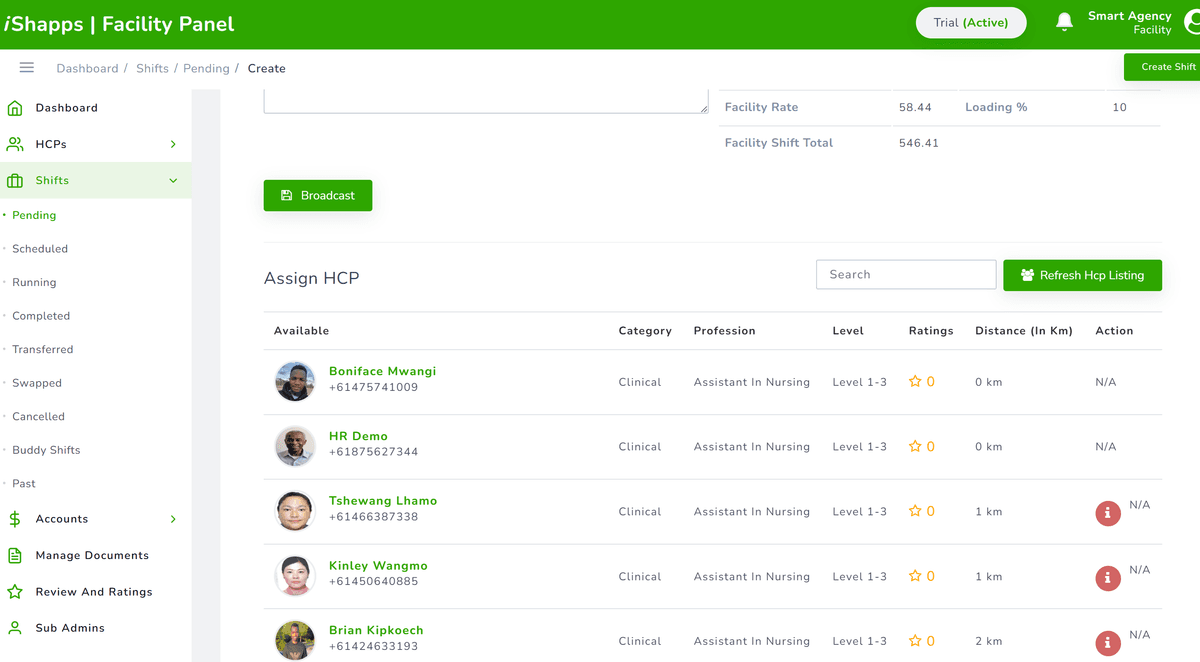
    Click "Get HCP Listing"
    A list of available healthcare professionals matching your requirements will appear.
  5. 5
    Assign or Broadcast
    Click Assign to send to a specific HCP, orBroadcast to open to the full HCP pool.
  6. â„šī¸
    2 Mins Broadcast Delivery: With Broadcast, shifts are delivered to HCPs and picked within 1-2 minutes, making it a fast and efficient way to fill openings.
Create Shift Window

Creating Multiple Shifts

In the Create Shift window, check theMultiple Shifts checkbox. A new window will appear where you can enter ward names and the number of openings per ward.
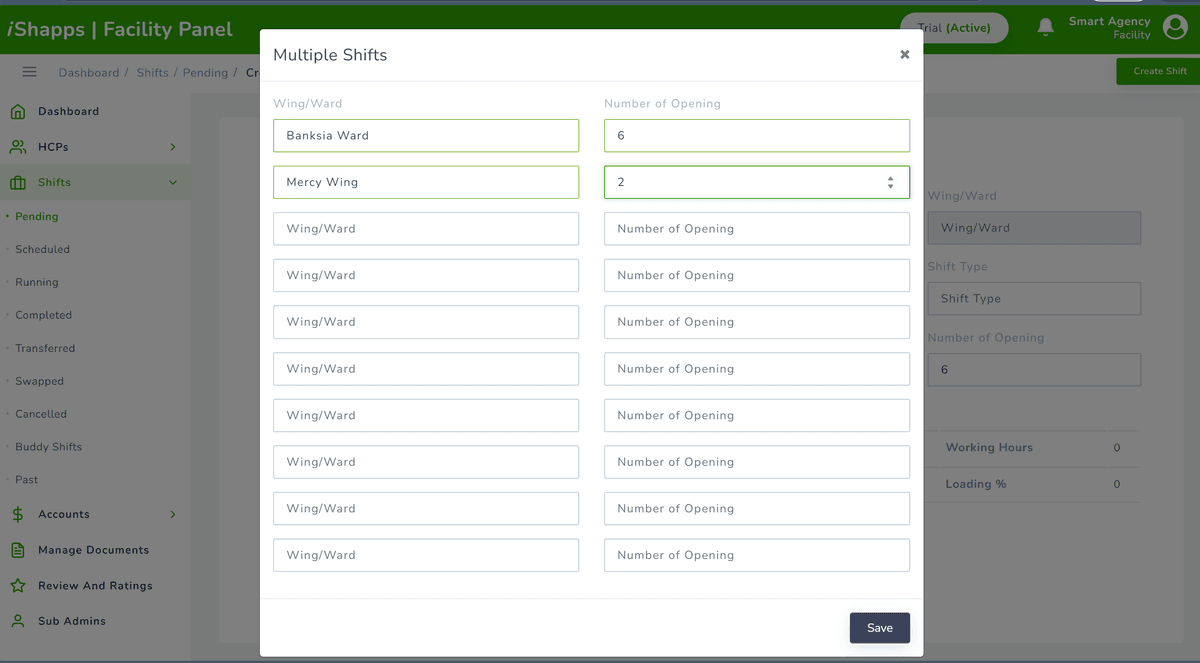
Multiple Shifts Window

2Assign vs Broadcast

HCP Listing

3Important Notes

â„šī¸
8-hour shifts: End time auto-populates from start time.
4-hour shifts: You must enter the end time manually.
💡
Break time is automatically calculated and subtracted. Percentage loading and shift estimates are also auto-calculated.
âš ī¸
If assigning to a specific HCP, contact them first to confirm availability — shifts can be rejected after assignment.
Chapter 4 ¡ Core Features
Managing HCPs
View, favourite, block and track active healthcare professionals associated with your facility.

1Active HCPs

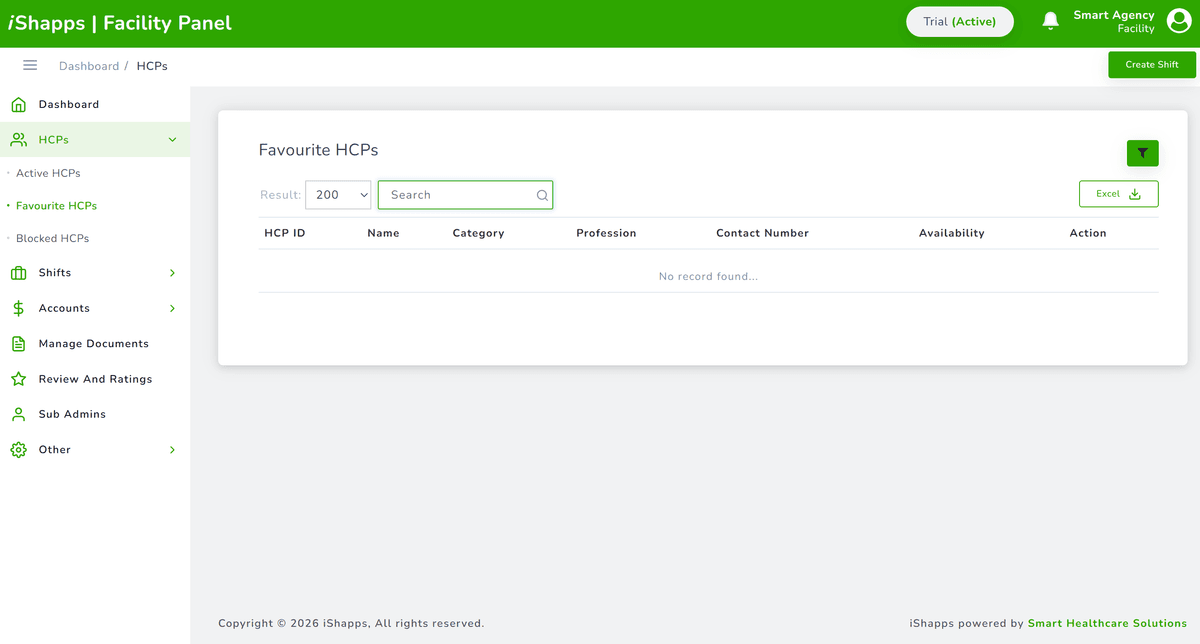
Navigate to HCPsin the left menu. Click on any HCP's ID to view their full shift history with your facility.
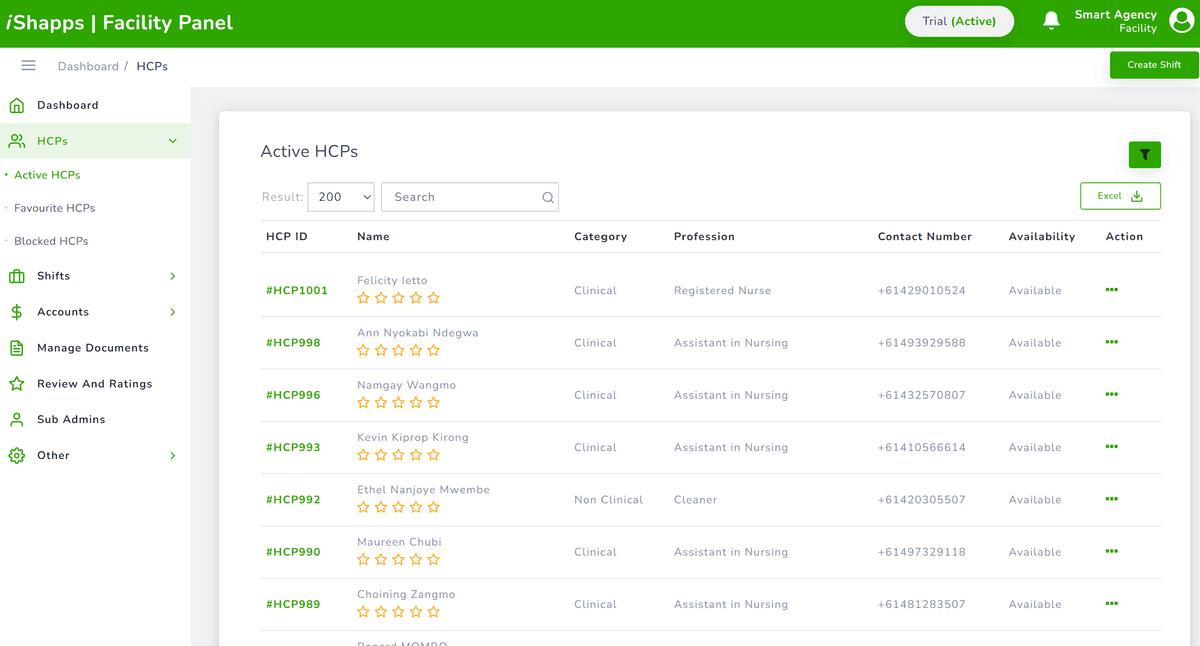
Active HCPs List

2Favouriting & Blocking

⭐
Favourite an HCP
Favourited HCPs are prioritised above other HCPs when broadcasting shifts.
đŸšĢ
Block an HCP
Blocked HCPs are excluded from all future shift broadcasts by your facility.
✅
Unblock
Access the blocklist to view details or remove an HCP from the blocked list.
Favourite and Block controls
💡
Broadcast priority order: Favourited HCPs → Highly-rated HCPs → All others.
Chapter 5 ¡ Reference
Shift Types
Understanding the different shift statuses and what each one means for your facility.

1All Shift Statuses

StatusDescription
CompletedShifts finished by HCPs. Approve by Thursday 5pm WAST for next week's pay run.
ScheduledAssigned or accepted by an HCP for a specific date and time.
PendingPosted by your facility but not yet assigned or accepted.
ActiveShifts currently in progress at your facility.
TransferredShifts transferred by HCPs, your facility, or an admin.
SwappedShifts swapped between HCPs.
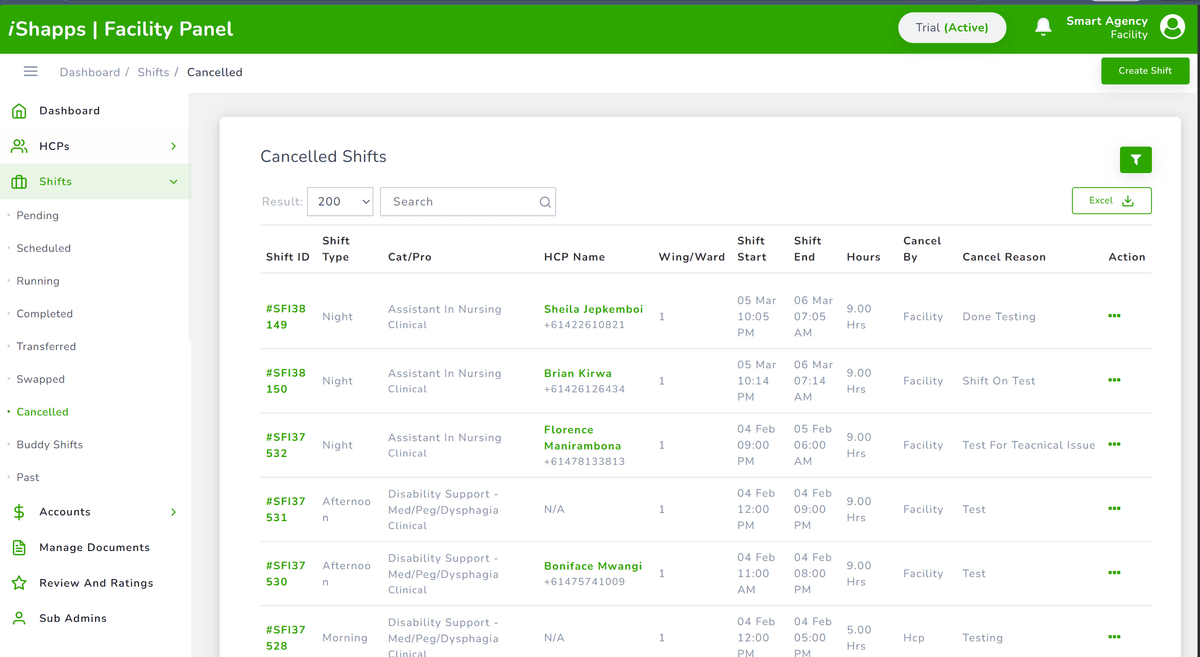
CancelledCancelled by HCPs, your facility, or an admin.
Paid / ApprovedCompleted shifts that have been approved and/or paid.
Buddy ShiftA training shift where a buddy is assigned to orient a new HCP.
Shifts menu

2Approving a Completed Shift

  1. 1
    Go to Completed Shifts
    Navigate to Shifts → Completed in the left menu.
  2. 2
    Click the three dots (⋮) under Actions
    A dropdown will appear with options to view, rate, or approve the shift.
  3. 3
    Click Approve
    Approved shifts are processed in the following week's pay run.
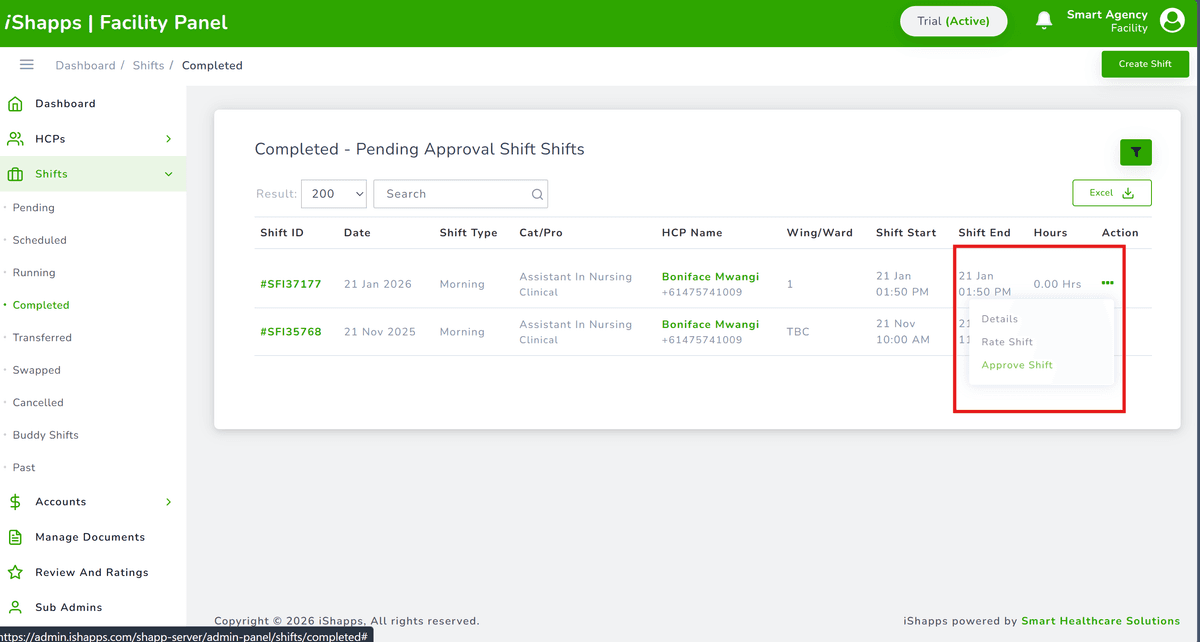
Approving a completed shift
âš ī¸
Approval deadline: Approve completed shifts byThursday 5:00 PM WAST for inclusion in the next weekly pay run.

3Starting a Shift (Emergency)

HCPs use the Start button on their mobile app at shift commencement. If technology fails, a facility admin or Smart Healthcare Solutions admin can start the shift on their behalf.
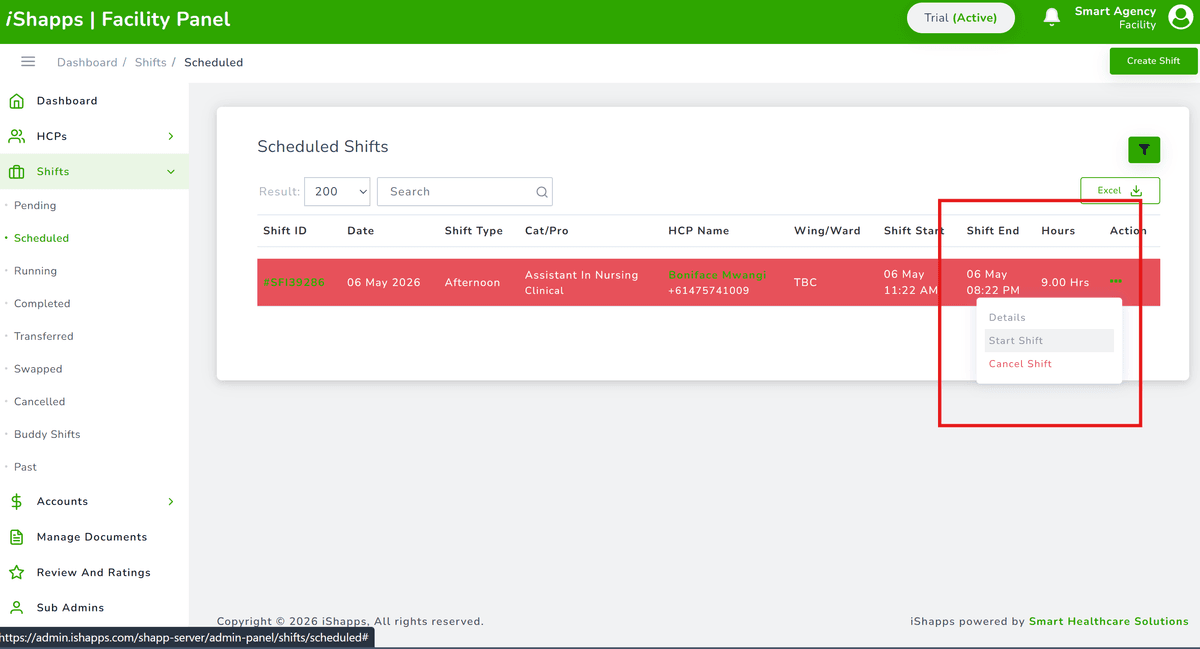
Emergency shift start button
â„šī¸
Only use the facility-side start function if the HCP is unable to start via their mobile app.
Chapter 6 ¡ Administration
Accounts & Invoices
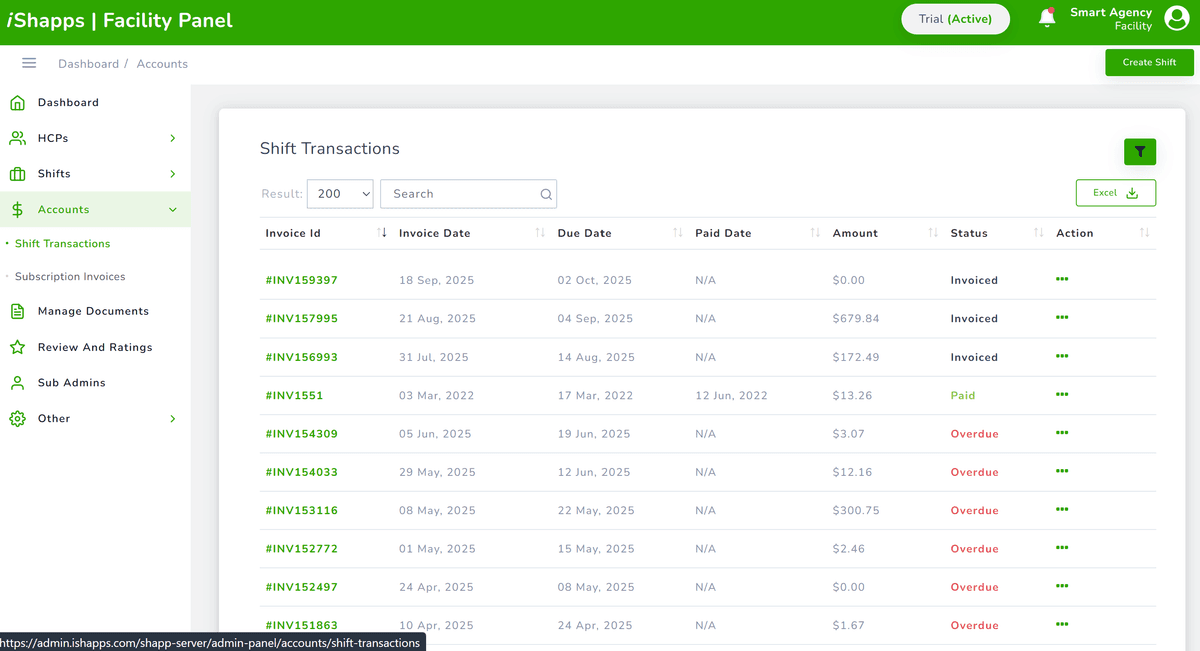
Access your shift transaction history and subscription invoices from the Accounts section.

1Accessing Accounts

Click Accounts in the left navigation menu to access billing details, shift transaction records, and subscription invoices.

Accounts Section
Chapter 7 ¡ Administration
Documents
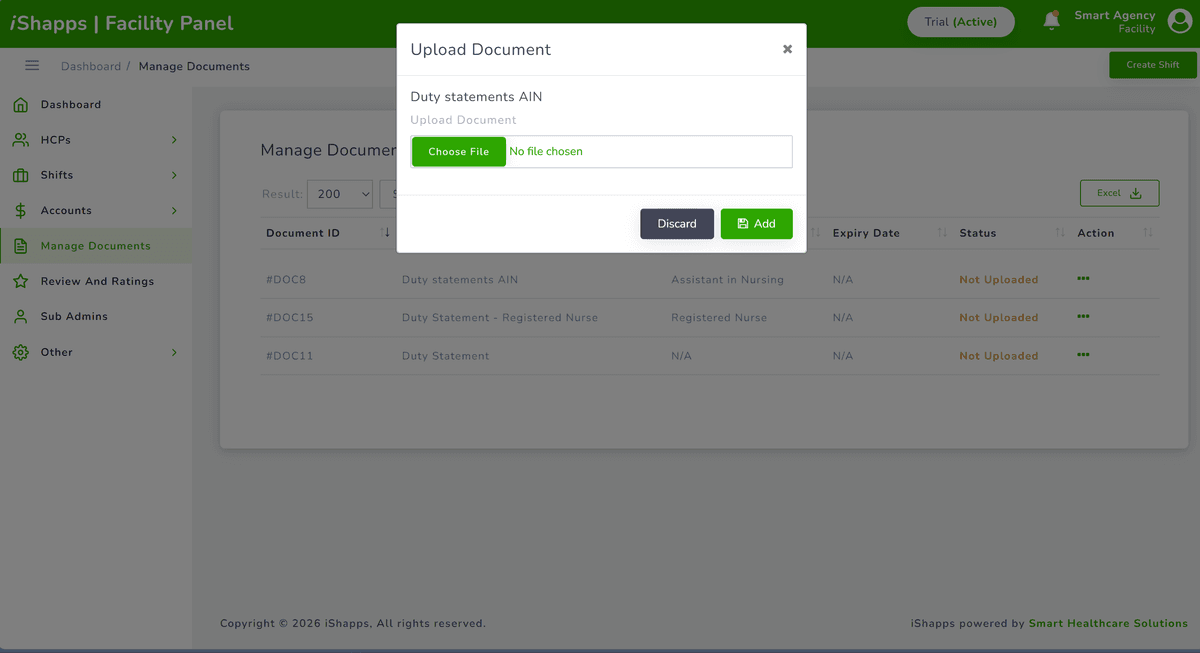
Upload duty statements and other documents that HCPs can access when a shift is posted.

1Uploading & Downloading Documents

  1. 1
    Click Documents in the left menu
    This opens the document management area.
  2. 2
    Click Actions
    A dropdown will appear with Upload and Download options.
  3. 3
    Select Upload or Download
    Uploaded duty statements are made available to HCPs when viewing shift postings.
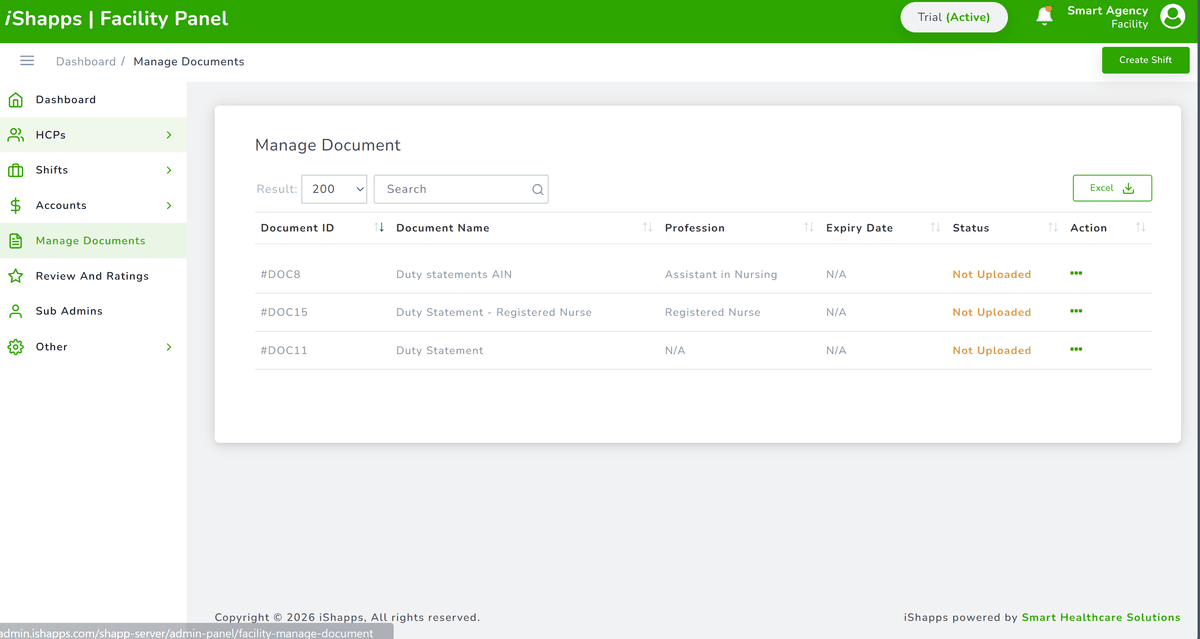
Documents SectionDocuments action menu
Chapter 8 ¡ Administration
Reviews & Ratings
Rate HCPs after each shift and view how your facility is rated by the HCPs who work with you.

1How Ratings Work

⭐
Rate an HCP
Rate performance after a completed shift via the three-dot Actions menu.
đŸĨ
Your Facility Rating
HCPs rate your facility — view this feedback in the Reviews section.
Reviews and Ratings
💡
Highly-rated HCPs are prioritised for shift broadcasts immediately after Favourited HCPs.
Chapter 9 ¡ Administration
Sub Admins
Add and manage additional administrator accounts for your facility.

1Managing Sub Admins

Navigate to Sub Admins in the left menu to add additional administrators and manage their access. Sub admins can perform most facility functions without full owner access.
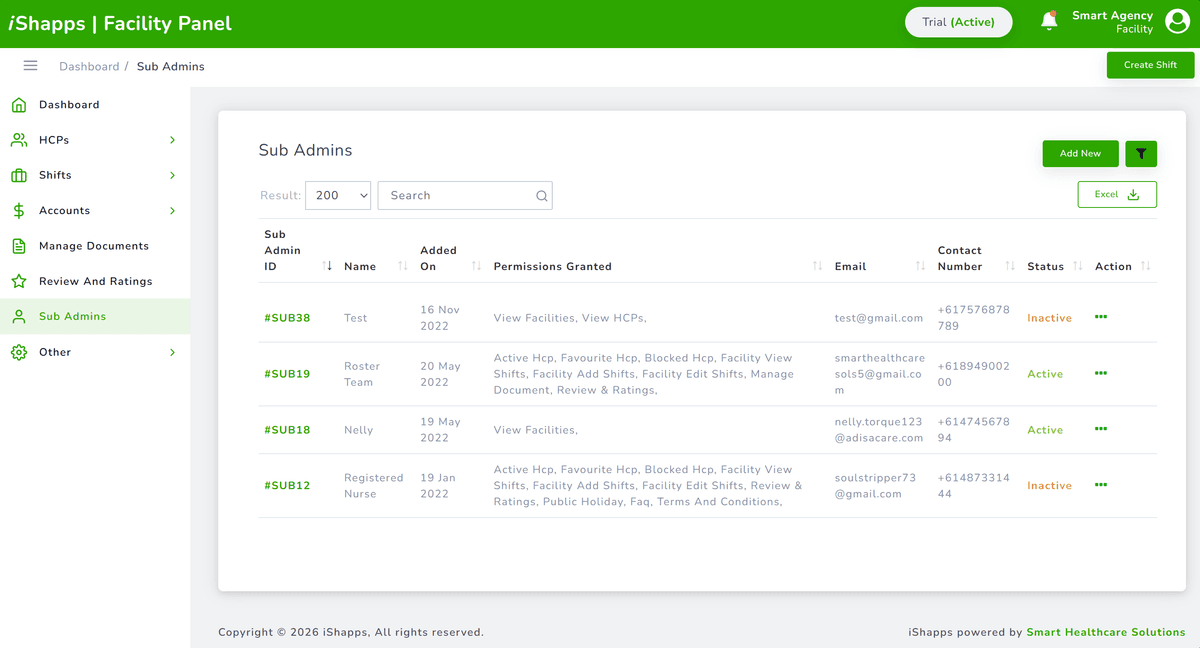
Sub Admins Section
â„šī¸
Under Others in the left menu you can also access Australian public holidays, FAQs, and Terms & Conditions.